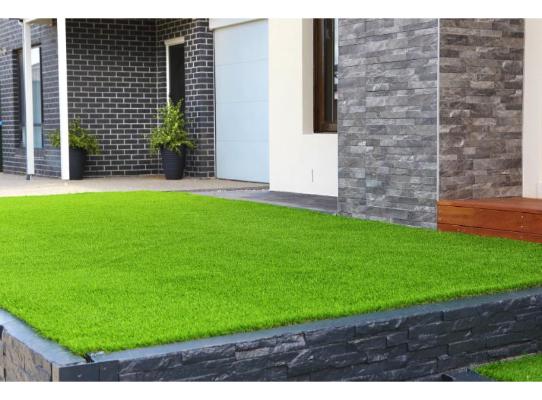
Artificial grass has grown in popularity, offering homeowners a stress-free alternative to traditional lawns. Do you desire a lush green patio but dread the constant mowing and maintenance of a natural lawn?
This might be the perfect solution for you. This innovative material is becoming increasingly popular for beautifying outdoor spaces. It offers a stylish and low-maintenance alternative to traditional lawns and even concrete patios.
This guide offers everything you need to know about installing artificial grass on your patio, from checking if your surface is suitable to the actual installation process. It’s time to say goodbye to yard work and hello to a stunning outdoor space you can enjoy year-round. Let’s get started!
Before You Start: Pay Attention to Safety
Safety should always be your first priority. Wear gloves and safety glasses when handling sharp objects or adhesives.
Step 1: Assess Your Ground Surface
Before installation, it’s important to ensure your patio is ready for the makeover. Unlike natural grass, which can bend and adapt to uneven ground, artificial grass needs a smooth and stable foundation. Below is a quick checklist that ensures your patio is ready for the installation:
- Give Your Patio a Thorough Cleaning: Sweep away any dirt, leaves, or debris scattered around. You can use a power washer or a hose for a thorough cleaning.
- Take Care of the Drainage: Of course, drainage is also important because water pooling under the grass is a no-no. If your outdoor surface does not have built-in drainage, we recommend creating a slight slop to help guide water flow away from the center.
- Level Up the Surface: If the surface is a bit bumpy, you don’t have to give up on beautifying your outdoor space. Consider using a level to identify any uneven areas. If you find some bumps and dips, you can use a self-leveling compound to create a smooth and even surface.
- Check for Holes and Cracks: Take a close look at the ground surface for any holes or cracks. If you find some, fill them with a suitable patching compound to ensure a strong foundation for your artificial grass.
- Weed out the Weed: While weeds are less likely to grow through concrete, it’s important to lay a weed barrier. This is a good preventative measure against any possible growth.
Now that your subfloor has been properly prepared, it’s time to get your hands dirty in the installation process. Depending on your patio material, you can use two primary methods: the Glue-down method, which is best for concrete patios, and the staple/nail method, which is perfect for wooden decks. We’ll look at the step-by-step guide in a moment.
Step 2: Gather Your Tools and Materials
For Both Methods: A sharp utility knife, stiff-bristled brush, tape measure, safety glasses and gloves, and seam tape (if you will join multiple pieces of the material).
For Glue-Down Method:
- Artificial grass (choose the perfect pile height and drainage backing for your specific needs)
- Special adhesive for application (make sure it’s compatible with your patio material and chosen grass).
- Notched trowel
For Staple/Nail Method:
- Artificial grass (choose the perfect pile height and drainage backing for your needs)
- Galvanized staples or nails
- Hammer (for nails) or staple gun (for staples)
Step 3: Complete the installation process
Installation for the Glue-Down Method (Concrete Patios):
- Prepare the patio: Ensure your cleaned patio is completely dry before continuing with the installation.
- Measure and Cut: Measure your patio and cut the artificial grass to the exact size. Leave a slight allowance (about one inch) for trimming after installation.
- Spread the Glue: Using the notched trowel, spread the adhesive across the patio surface in small, manageable sections. Work quickly to prevent the adhesive from drying before laying the grass.
- Lay and Smooth: Carefully place the grass on the adhesive, starting from one end and working your way outwards. Smooth out the grass as you go, ensuring there are no bubbles or wrinkles.
- Joining Multiple Pieces: If using multiple pieces, use seam tape to create a seamless connection. Follow the seam tape manufacturer’s instructions carefully for a professional finish.
- Trim the Excess: Once the grass is laid, use the sharp utility knife to carefully trim any excess edges along the perimeter of the patio.
- Secure the Edges: While the glue dries, weigh down the edges of the artificial grass with heavy objects or special adhesive weights. This ensures a strong bond between the grass and the concrete.
Installation for the Staple/Nair Method (Wooden Decks):
- Prepare the Deck: Ensure your deck is in good condition, free from rot or damage. Replace any damaged boards, and give the surface a thorough cleaning to remove dirt and debris.
- Measure and Cut: Measure your deck and cut the artificial grass to the exact size. Leave a slight allowance of about one inch for trimming after installation.
- Lay the Grass: Roll out the cut material on the deck and allow it to relax for a few hours. This allows the fibers to settle and reduces wrinkles during installation.
- Secure the Edges: Starting from one corner, use galvanized staples or nails to secure the edges of the grass to the deck at a spacing of approximately 6 inches. Ensure the staples or nails penetrate the grass backing securely and go deep enough into the deck for a firm hold. Work your way around the perimeter, maintaining consistent spacing between the fasteners.
- Trip the Excess: Once the edges are secure, use the sharp utility knife to carefully trim any excess edges of the artificial grass along the perimeter of the deck. Take your time for clean and precise cuts.
Step 4: Finishing Touches (For Both Methods)
- After securing the installation, use the stiff-bristled brush to brush the fibers in the opposite direction of their natural lie. This helps the blades stand upright, giving the grass a more natural appearance.
Congratulations! You have successfully completed the installation. Now you can enjoy your beautiful, low-maintenance outdoor haven.
How to Maintain Your Artificial Grass
Regular maintenance is important for long-lasting beauty. Let us look at some simple tips to help you maintain your new installation:
- Brushing: Brush the grass regularly with a stiff-bristled brush to remove debris and maintain the natural look.
- Cleaning: You can clean the artificial grass occasionally with a mild solution of water and a gentle detergent. Rinse thoroughly with clean water and allow the grass to dry completely before stepping on it.
- Leaf Removal: Remove any leaves or debris that may accumulate on the surface.
By following these comprehensive installation guides and maintaining the installation properly, you can enhance the look of your patio and turn it into a stunning and low-maintenance outdoor space for years to come.